| « BACK | CONTENTS | NEXT » |
The most important part of the VCC panel is made up of three main tabs.
The first two are very similar but Gradient has a further three sub sections. Each tab can be accessed by using the corresponding buttons near the top of the panel.
- Strength works with individual or multiple channels using 0 - 1 grayscale values, 0 being black and 1 white.
- Colour uses full 4 channel colours, Red, Green, Blue and Alpha.
- Gradient uses several different gradient approaches and includes the option to apply values to individual or multiple channels.
The Strength Tab
Channel Selector
The channel selectors represent the red, green, blue and alpha vertex colour channels, if for example the “R” button is highlighted, this means that any strength value applied will be applied to the red vertex colour channel.
Copy
This button opens a sub menu with four buttons labelled R, G, B and A. By then selecting one of those the average strength of the currently selected vertices from the corresponding channel will be stored in the Strength value.
Strength
This is the value that is used when applying strength values to a vertices’ vertex colour values.
Apply
This button applies the Strength value to all of the vertices of the current vertex, edge or face selection.
Presets
For an explanation of presets see: https://github.com/SqueyedGuy/VCC-Docs/wiki/Presets-Explained
The Colour Tab
Copy
This sets the stored Colour value to the average colour value of the selected vertices’ vertex colour value.
Colour
This is the colour value that is used when applying colour values to the selected vertices’ vertex colour values.
Apply
This button applies the current colour value to all of the vertices of the current vertex, edge or face selection.
Presets
For an explanation of presets see: https://github.com/SqueyedGuy/VCC-Docs/wiki/Presets-Explained
The Gradient Tab
Linear Tab
Reset
This resets all of the gradient portion of the Channel Selector material back to it’s default settings.
Use World Position
When disabled the offset values are calculated in each mesh’s local space, when enabled the offset values are calculated in world space.
Local/World Offset
These controls affect the origin point of the gradient, they are directly affected by the “Use World Position” value. If “Use World Position” is true then the offset will be calculated from the world origin (0, 0, 0), if “Use World Position is false then the mesh pivot point will be used as the origin for the offset calculation.
Rotation
You can rotate your gradient on two axis, X and Y, the reason for the absence of the Z axis is that the gradient is projected along the Z axis prior to the rotation.
Scale
Scale allows you to squash or stretch your gradient. A scale of 1 is equal to 1m, 0.5 is equal to 50cm for example. The Mirror setting is not included in this calculation, in that circumstance 1 would be equal to 2m.
Mirror
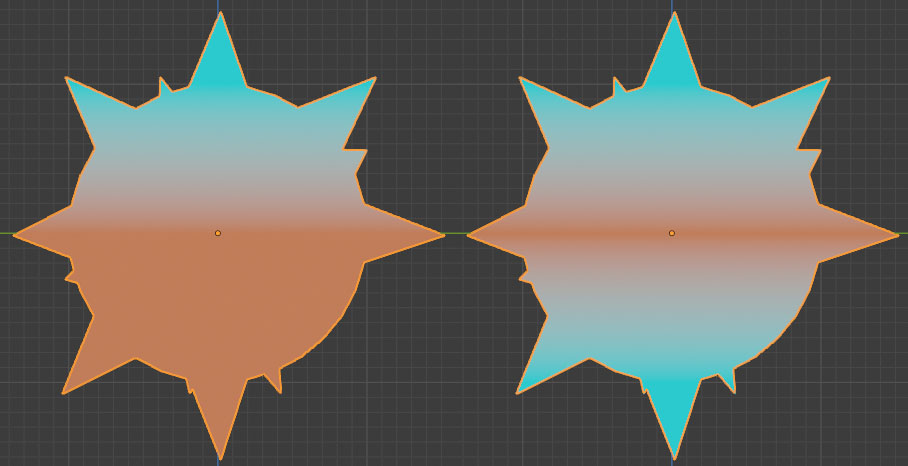
Mirror extends the usual 0 - 1 range of the gradient effect, with Mirror enabled the range should be considered as though it were -1 - 0 - 1.


The example on the left shows an unmirrored linear gradient and on right a mirrored linear gradient.
Spherical Tab
Reset
This resets all of the gradient portion of the Channel Selector material back to it’s default settings.
Use World Position
When disabled the offset values are calculated in each mesh’s local space, when enabled the offset values are calculated in world space.
Local/World Offset
These controls affect the origin point of the gradient, they are directly affected by the “Use World Position” value. If “Use World Position” is true then the offset will be calculated from the world origin (0, 0, 0), if “Use World Position is false then the mesh pivot point will be used as the origin for the offset calculation.
Distance
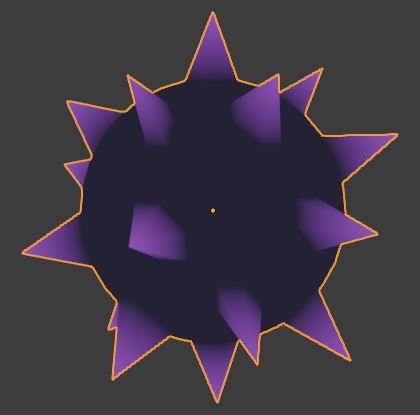
The Distance value is calculated as the distance from the Local/World Offset. It is comprised of two values, the Min (minimum) and Max (maximum). The Min value represents the starting or 0 position of the gradient’s colour ramp and the Max value is the ending or 1 position of the gradient’s colour ramp. If the distance to the points on the mesh you intend to apply the gradient to are not within the Min and Max values you won’t get the benefit of the gradient.

This example shows a spiked sphere where the vertices that make up the spherical portion are all approxamitely 1m from the mesh origin point, the tips of the spikes are just over 1.5m from the origin.
Note: If the Max value is less than the Min value then the gradient will be inverted.
Normal Tab
Reset
This resets all of the gradient portion of the Channel Selector material back to it’s default settings.
Use World Direction
When disabled the normal direction is calculated in each mesh’s local space, when enabled the normal direction is calculated in world space.
Normal Direction
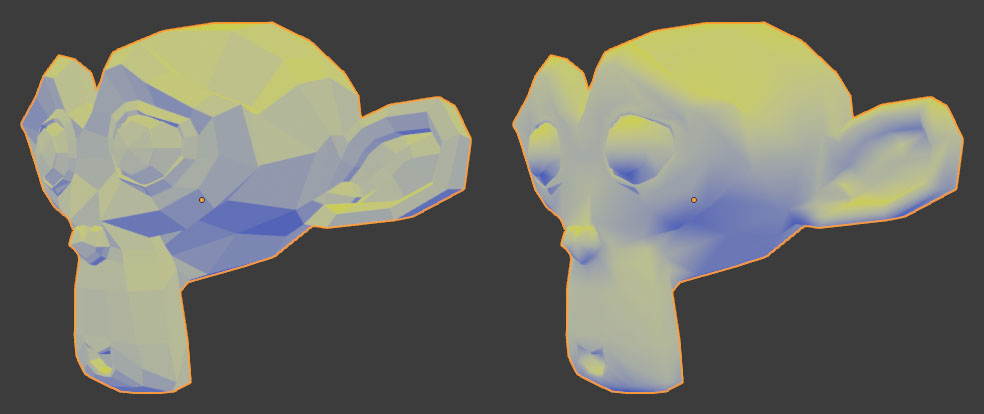
Normal Direction is the direction which the ending of the gradient colour ramp is aimed. The default value of (0, 0, 1) is pointing directly upwards, in this case the 0 position on the colour ramp would be projected onto mesh normals that face directly down while the 1 position on the colour ramp would be project onto the mesh normals that point directly up.


This is an example of an upward (0, 0, 1) Normal Direction value, the left image is of a flat shaded mesh and the right image is a smooth shaded mesh.
Balance
Balance allows you to compress the range of effectiveness of the Normal Direction value, the minimum value is -1, this is representative of the opposing value to the normal direction, a Balance value of 1 would completely remove the effect entirely.
Engine Section
Engine
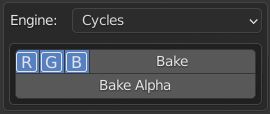
While using the gradient baking feature the rendering engine must be set to Cycles. When the message in the above image appears, the baking controls will not appear below “Engine”.
Channel Selector
These three channel selector buttons control which of the red, green and blue colour channels of the gradient will be baked into your mesh’s vertex colours.
Bake
“Bake” takes the colour values from the gradient shader and applies them to the vertices of the currently selected vertex, edges or faces. Only the red, green and blue channels are covered in this instance and also affected by the channel selector values.
Bake Alpha
“Bake Alpha” takes the strength values from the gradient shader and applies them to the vertices of the currently selected vertex, edges or faces. Only the alpha channel is covered in this instance.
Channel Viewer Section
If there is a button here labelled “Locate/Import Channel Viewer” this means that when the Blend file loaded the add-on was unable to locate the Channel Viewer material, in this case you need to click this button to import it. Once the material has been imported you’ll be able to view isolated colour channels.
IMPORTANT: To use the Channel Viewer material, you must apply it to each mesh you require, you must also set the shading in your viewport to “Material Preview”.
Channel viewer
The five buttons in this row control which vertex colour channels are viewed through the Channel Viewer material. From left to right the options are Red, Green, Blue, Alpha and lastly a combination of red, green and blue.
Gradient viewer
The “Gradient Viewer” allows you to get a preview of what the vertex colours baked from your gradient may end up looking like, though a variety of variables including mesh resolution, placement of each vertex, triangulation etc can affect your final bake.
The five buttons in this row control which gradient colour channels are viewed through the Channel Viewer material. From left to right the options are Red, Green, Blue, Alpha and lastly a combination of red, green and blue.
Additional Settings
![]()
Currently the Additional Settings Button only accounts for one option but will likely host more in the future.
Use Custom Layer Name

Using a custom layer name overrides the default vertex colour layer name of “VCC Colour”. This would probably be most useful if you wanted to prevent another layer from being overwritten or if you wanted to add to an existing layer that is not called “VCC Colour”.
| « BACK | CONTENTS | NEXT » |


